Shower Tile Installation
Demolition
Stage 1: Demolition
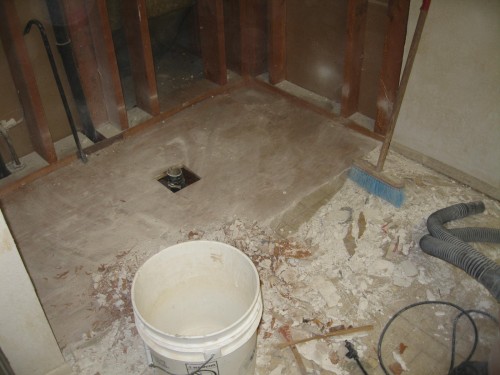
During demolition we begin by protecting carpeting between the bathroom and our disposal truck with tarps to keep your house as clean as possible. Next, we carefully removing any fixtures which you aren’t going to replace so that they can be re-installed after we’re done. Then we remove all existing fixtures, shower tubs, doors, drains, tile… everything comes out.
We take your entire shower down to the wall studs. Every time. This gives us a clean canvas upon which our craftsmanship will be displayed. Yes, you will never see this, but that doesn’t mean we don’t still want it to be perfect! If you don’t go down to the studs, there’s no way you can create a fresh, clean, true to plumb surface.
Plumbing
Stage 2: Plumbing
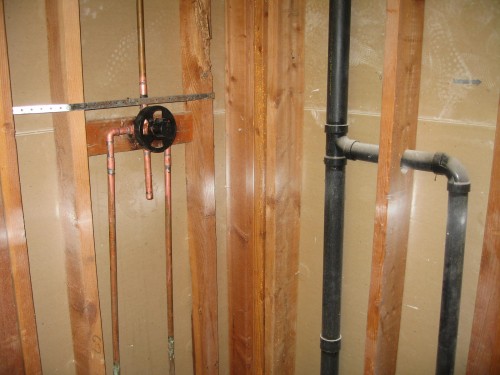
Once everything is down to the studs, a master plumber installs new shower valves and a new drain system. These are newly installed to fit with your new design and the new tile thickness that will be created from adding tile.
Framing
Stage 3: Framing
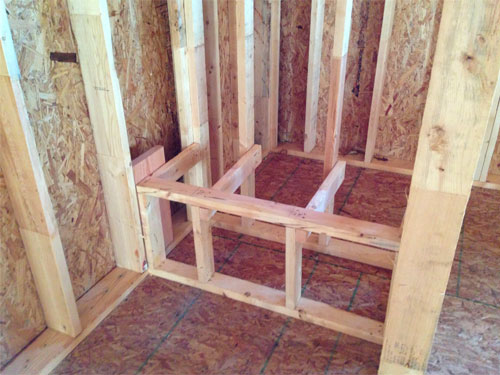
Once all the plumbing is in place, the entire shower’s new structure is framed out. This includes an optional seat and optional niche. We can also add reinforcements for handrails, even if you are not installing them yet, as we did in this situation.
By framing out the new shower structure, we are able to ensure that all walls will be true to plumb and level, allowing us to create a flat surface for even tile. Having a truly flat surface for your tile makes a huge difference in how long it lasts, how effective it is and how it looks.
Water Proofing
Stage 4: Water Proofing
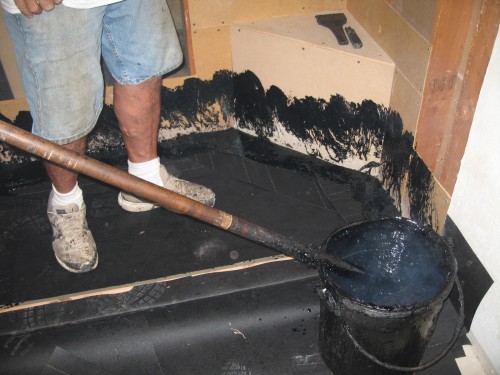
This is the most critical part of installing a new shower – creating a waterproof shower pan that will be behind the tile grout and mortar. Vinny Pizzo Tile always uses a hot-mop system to do this because it is the only way to guarantee a truly waterproof and sealed surface.
During hot mopping, liquid tar is painted in layers with waterproof tar paper over the entire basin of the shower where water will collect. This process can be smokey, so it is always recommended to keep the house windows open and animals as far away as possible while the hot mop specialist is putting down the tar.
In addition to creating a waterproof barrier, hot mopping creates a smooth drainage ramp down to a secondary seepage port in your drain. There will always be some soaking through of the tile and grout, the shower pan is what is finally waterproof. By sloping the shower pan to the seepage port in the drain, you allow even this seepage to drain off effectively. This is essential because water that stands and collects creates mold, mildew and damage. Hot mopping prevents this.
Our clients always ask us why we don’t use a prefabricated material for this process like other contractors. While it’s true that prefabricated materials might speed up the process a slight bit, you will always have to use something to seal the joints, such as a tape or adhesive.
Make sure to see our video of a shower pan gone bad to see just how many problems one of these prefabricated materials can have, especially if installed poorly.
One thing about water is that it WILL get in wherever it can. If there’s even the slightest crack in that adhesive or the tape sealing that crack, water will seep through and collect – rotting away the beams and structure of not only your shower but your house and health as well. It’s just not worth the risk to trust your investment to anything less than the best technique.
Water Proofing Testing
Stage 5: Water Proofing Testing (optional)
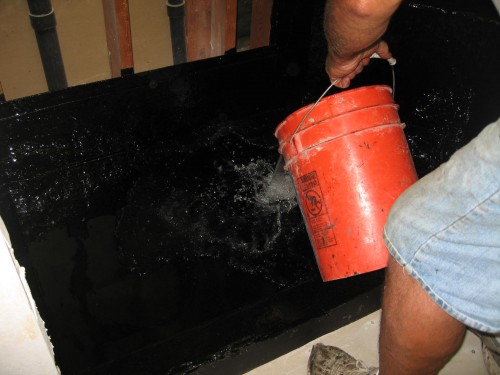
We are very confident in our hot mopping technique and have never had any problems with leaks or cracks due to craftsmanship. Some clients wish to test the technique at this point, however, before the tile goes on. This is done via an overnight water test.
During this test the pan of the shower is filled with water, it’s level is measured and the drain plugged. Then it is left to sit overnight. In the morning another measurement is taken to ensure no water has been lost.
If you wish to include this test as part of your shower installation, make sure to ask for it and be aware that it will extend your project timeline.

Floating the Tile
Stage 6: Floating the Tile
Once the hot mopped shower pan is in place, it’s time to create a surface for laying the tile. This is another area where we insist on time tested techniques instead of the slightly quicker alternative. Like hot mopping, we insist on this because it ensures that you have a watter proof, plumb, flat surface behind your tiles. To do this we use the older technique that requires special craftsmanship skills and is called “lath, scratch and float.”
This process is very similar to the process used to waterproof the outside of your house. If you’d use it for that, which sees rain only occasionally, doesn’t it make sense to use it for your shower which sees ‘rain’ daily?
We start by building up the walls of your shower. Then we use tar paper to water proof this. Chicken wire is used to create a textured surface to hold the cement which will follow. Finally, we put on a layer of cement to create a 100% plumb and flat surface upon which the tile will hang. This surface is called the ‘scratch coat’.
Using lath, scratch and float is our technique of choice for a couple of reasons. First of all it allows us to create a waterproof, solid surface upon which to hang your tile. This cannot be done using the more common ‘backer board’ technique because you will always have joints which must be covered with tape to seal them. Again, if there’s even the smallest crack, you’ll end up with mold, mildew and damage over time. Backer board has it’s place and it’s uses, but just not in a location where waterproofing is essential.
Secondly, it allows us to make the fine adjustments required to create a truly flat surface upon which to hang your tile. We use a plumb and level to ensure that the surface, when we’re done with it, is as flat as possible to allow us to professionally lay level and even tile.
Laying the Tile
Stage 7: Laying the Tile
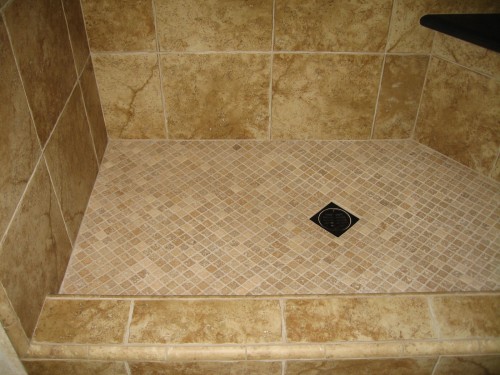
After the scratch coat has dried, we can lay the tile – which we call ‘floating’ it. Grout and mortar is used to create a professional and beautiful finish to your shower, from the walls to the floor.
Tile Floor Installation
Tile floors, like their uses, range widely in style and look. From intricate mosaics that require hours to piece together and which create a stunning look for your business foyer, to simple bathroom tiling that keeps your floors from being ruined by water, we do it all!
The same skills and attention we put into a several thousand dollar mosaic, we put into your simple white tile apartment bathroom. Why? Because every customer deserves the best tiling job we can give them.
Part of that attention to detail employing techniques which allow us to level and create a unified surface for you new tile floor to be created on. While these are ‘background’ steps that aren’t readily visible in the finished floor, they are what allow you to enjoy your new tile for a lifetime instead of a matter of years.

Our most commonly used technique is called a “Mud Set.” We like to use this process because it provides you with a more level surface, and allows us to compensate in older homes for the subtle shifting houses do over time.
When create a mud set floor, we start by laying a protective barrier wherever there are any cracks or problems with the foundation.

These barriers vary in both cost and type, depending on the condition of the subfloor, however they help us to create a floor that is more resistant to cracking and shifting as the years go by. Once we get your existing floor up, our experts will talk with you about the different options for this part of the process. In your initial tile floor estimate, we address this issue, but we can never know the full extent of what will be needed until we see the condition of the subfloor. This extra process costs more – there’s more labor, materials and skill involved in sealing and creating a barrier against cracks.

Unfortunately, this is a process that is too often skipped by contractors trying to cut corners. This is bad news for the home owner, cracks that existed before the tile floors were laid will quickly reappear again in you new tile and there is nothing in the way to help abate new cracks. Your tile floors should last a lifetime, don’t cut corners or trust a contractor who does, just to save a buck on the front end – it will cost you much more later down the road.
Once the crack repair option is in place, we begin to lay your tile floors. We start with a thin-set layer. This material helps adhere the mud set to the existing subfloor, cement and/or crack repair.

Next, our skilled craftsmen lay down a thick layer of mud set material. This is then compacted and the tile position set up. If the tile needs to be cut to fit a corner (Or rounded stairwell as in this picture) it is done at this point. Creating a compacted mud set layer is what will later allow us to create a level and even surface. Our craftsmen know that the key to a beautiful floor is the skill with which they create the mud set layer, they work to get it perfect before they move on because once the tile is down one of the advantages (and disadvantages for the unskilled) is that it’s not moving again.

Once the mud set is in place, we begin to lay your tile floors. Again, we use a layer of thin set material to adhere the tile to the mud set layer. Once the new tile is in place, our exacting craftsmen use levels to make sure that each tile is perfectly in place and aligned with it’s neighbors before moving on to the next tile. This takes a bit longer, but the exact corner matches that we are able to achieve are the difference between our old world craftsmanship and skills and the average tile installation. For you, it comes out in the feeling of luxury that perfectly matched tiles gives – it’s no longer just a floor upgrade, it’s a lifestyle upgrade.

In addition to the mud set technique, we employ a variety of other techniques when the situation doesn’t require this process. Upper floors, for instance, frequently don’t need or can’t handle this heavier installation. When we work with you to create a vision for the tile floors you want, we will discuss all the options available for your specific situation and help you understand and make a knowledgeable decision about how to proceed.
Note: Please be aware that by using a mud-set technique, we create a higher floor surface which can raise the floor from 1 to 1.5 inches.